Writing your First Tool
While Obot ships with a robust library of built-in tools, building custom tools tailored to your ecosystem will supercharge your Agents.
The following guides will show you how to write and package custom tools in Python, Node.js, and Go; unleashing the full potential of your agents by enabling them to integrate with any data source, service, or platform with just a few lines of code.
- Python
- Node.js
- Go
Writing your first tool in Python
python-hash-tool contains a reference Python implementation of the Hash tool.
This guide walks through the structure and design of the tool and outlines the packaging requirements for Obot
To clone this repo and follow along, run the following command:
git clone git@github.com:obot-platform/python-hash-tool
Tool Repo Structure
The directory tree below highlights the files required to implement Hash in Python and package it for Obot.
python-hash-tool
├── hash.py
├── requirements.txt
└── tool.gpt
Defining the Hash Tool
The tool.gpt file contains GPTScript Tool Definitions which describe a set of tools that can be used by agents in Obot.
Every tool repository must have a tool.gpt file in its root directory.
The tools defined in this file must have a Name and Description that will help agents understand what the tool does, what it returns (if anything), and all the Parameters it takes.
Agents use these details to figure out when and how to use the tool. We call the section of a tool definition that contains this info a Preamble.
We want the Hash tool to return the hash of some given data. It would also be nice to support a few different algorithms for the agent to choose from.
Let's take a look at the Preamble for Hash to see how that's achieved:
Name: Hash
Description: Generate a hash of data using the given algorithm and return the result as a hexadecimal string
Param: data: The data to hash
Param: algo: The algorithm to generate a hash with. Supports "sha256" and "md5". Default is "sha256"
Breaking this down a bit:
- The
Preambleabove declares a tool namedHash - The
Paramfields enumerate the arguments that an agent must provide when callingHash,dataandalgo - In this case, the description of the
algoparameter outlines the valid options (sha256ormd5) and defines a default value (sha256) - The
Descriptionexplains whatHashreturns with respect to the given arguments; the hash ofdatausing the algorithm selected withalgo
Immediately below the Preamble is the Tool Body, which tells Obot how to execute the tool:
#!/usr/bin/env python3 ${GPTSCRIPT_TOOL_DIR}/hash.py
This is where the magic happens.
To simplify, when an agent calls the Hash tool, Obot reads this line and then:
- Downloads the appropriate
Pythontoolchain - Sets up a working directory for the tool and creates a virtual environment
- Installs the dependencies from the
requirements.txt, if present - Projects the call arguments onto environment variables (
DATAandALGO) - Runs
python3 ${GPTSCRIPT_TOOL_DIR}/hash.py
Putting it all together, here's the complete definition of the Hash tool.
Name: Hash
Description: Generate a hash of data using the given algorithm and return the result as a hexadecimal string
Param: data: The data to hash
Param: algo: The algorithm to generate a hash with. Default is "sha256". Supports "sha256" and "md5".

#!/usr/bin/env python3 ${GPTSCRIPT_TOOL_DIR}/hash.py
Tool Metadata
The snippet below (from the tool.gpt file) also provides the following metadata for use in Obot:
!metadata:*:categorywhich tags all tools in thetool.gptfile with theCryptocategory to promote organization and discovery!metadata:*:iconwhich assignshttps://cdn.jsdelivr.net/npm/@phosphor-icons/core@2/assets/duotone/fingerprint-duotone.svgas the tool icon to all tools in thetool.gptfile
Note:
*is a wildcard pattern that applies the metadata to all tools in atool.gpt.
---
!metadata:*:category
Crypto

---
!metadata:*:icon
https://cdn.jsdelivr.net/npm/@phosphor-icons/core@2/assets/duotone/fingerprint-duotone.svg
Note: Metadata can be applied to a specific tool by either specifying the exact name (e.g. !metadata:Hash:category) or by adding the metadata directly to a tool's Preamble
!metadata:Hash:category) or by adding the metadata directly to a tool's PreambleName: Hash
Metadata: category: Crypto
Metadata: icon: https://cdn.jsdelivr.net/npm/@phosphor-icons/core@2/assets/duotone/fingerprint-duotone.svg
Complete tool.gpt
---
Name: Hash
Description: Generate a hash of data using the given algorithm and return the result as a hexadecimal string
Param: data: The data to hash
Param: algo: The algorithm to generate a hash with. Supports "sha256" and "md5". Default is "sha256"

#!/usr/bin/env python3 ${GPTSCRIPT_TOOL_DIR}/hash.py

---
!metadata:*:category
Crypto

---
!metadata:*:icon
https://cdn.jsdelivr.net/npm/@phosphor-icons/core@2/assets/duotone/fingerprint-duotone.svg
Implementing Business Logic
The hash.py file executed by the Tool Body is the concrete implementation of the tool's business logic.
Let's walk through the code to understand how it works.
if __name__ == '__main__':
    try:
        main()
    except Exception as err:
        # Print err to stdout to return the error to the agent
        print(f'Error: {err}')
        sys.exit(1)
Starting at the bottom, the main function is called in a try block so that any runtime exceptions caught are written to stdout.
This is important because everything written to stdout is returned to the agent when the tool call is completed, while everything written to stderr is discarded.
Using this pattern ensures that when a tool call fails, the calling agent is informed of the failure.
Moving on, the main function implements the core logic of the Hash tool.
SUPPORTED_HASH_ALGORITHMS = ['sha256', 'md5']

def main():
    # Extract the tool's `data` argument from the env
    data = os.getenv('DATA')
    if not data:
        raise ValueError('A data argument must be provided')

    # Extract the tool's `algo` argument from the env and default to `sha256`
    algo = os.getenv('ALGO', 'sha256')
    if algo not in SUPPORTED_HASH_ALGORITHMS:
        # Return the supported algorithms in the error message to help agents choose a valid
        # algorithm the next time they call this tool
        raise ValueError(f'Unsupported hash algorithm: {algo} not in {SUPPORTED_HASH_ALGORITHMS}')
    #...
It starts off by extracting the tool's arguments from the respective environment variables and validates them.
When an argument is invalid, the function raises an exception that describes the validation issue in detail.
The goal is to provide useful information that an agent can use to construct valid arguments for future calls.
For example, when an invalid algo argument is provided, the code returns an error that contains the complete list of valid algorithms.
After validating the tool arguments, it calculates the hash and writes a JSON object to stdout. This object contains the hash and the algorithm used to generate it.
    # ...
    # Generate the hash
    hash_obj = hashlib.new(algo)
    hash_obj.update(data.encode('utf-8'))

    # Return the hash along with the algorithm used to generate it.
    # Providing more information in the tool's response makes it easier for agents to keep
    # track of the context.
    print(json.dumps({
        'algo': algo,
        'hash': hash_obj.hexdigest()
    }))
Note: Producing structured data with extra contextual info (e.g. the algorithm) is considered good form. It's a pattern that improves the Agent's ability to correctly use the tool's result over time.
Complete hash.py
import hashlib
import json
import os
import sys

SUPPORTED_HASH_ALGORITHMS = ['sha256', 'md5']


def main():
    # Extract the tool's `data` argument from the env
    data = os.getenv('DATA')
    if not data:
        raise ValueError('A data argument must be provided')

    # Extract the tool's `algo` argument from the env and default to `sha256`
    algo = os.getenv('ALGO', 'sha256')
    if algo not in SUPPORTED_HASH_ALGORITHMS:
        # Return the supported algorithms in the error message to help assistants choose a valid
        # algorithm the next time they call this tool
        raise ValueError(f'Unsupported hash algorithm: {algo} not in {SUPPORTED_HASH_ALGORITHMS}')

    # Generate the hash
    hash_obj = hashlib.new(algo)
    hash_obj.update(data.encode('utf-8'))

    # Return the hash along with the algorithm used to generate it.
    # Providing more information in the tool's response makes it easier for assistants to keep
    # track of the context.
    print(json.dumps({
        'algo': algo,
        'hash': hash_obj.hexdigest()
    }))


if __name__ == '__main__':
    try:
        main()
    except Exception as err:
        # Print err to stdout to return the error to the assistant
        print(f'Error: {err}')
        sys.exit(1)
Testing hash.py Locally
Before adding a tool to Obot, verify that the Python business logic works on your machine.
To do this, run through the following steps in the root of your local fork:
-
Set up a virtual environment:
python3 -m venv venv
source venv/bin/activate -
Activate the virtual environment:
source venv/bin/activate -
Install and freeze dependencies:
pip install -r requirements.txt
pip freeze > requirements.txt -
Run the tool with some test arguments:
Command Output DATA='foo' python3 hash.py{ "algo": "sha256", "hash": "2c26b46b68ffc68ff99b453c1d30413413422d706483bfa0f98a5e886266e7ae" }python3 hash.pyError: A data argument must be providedDATA='foo' ALGO='md5' python3 hash.py{ "algo": "md5", "hash": "acbd18db4cc2f85cedef654fccc4a4d8" }DATA='foo' ALGO='whirlpool' python3 hash.pyError: Unsupported hash algorithm: whirlpool not in ['sha256', 'md5']
Adding The Hash tool to Obot
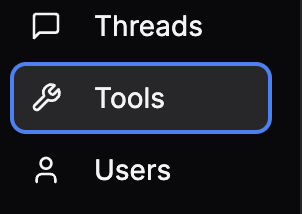
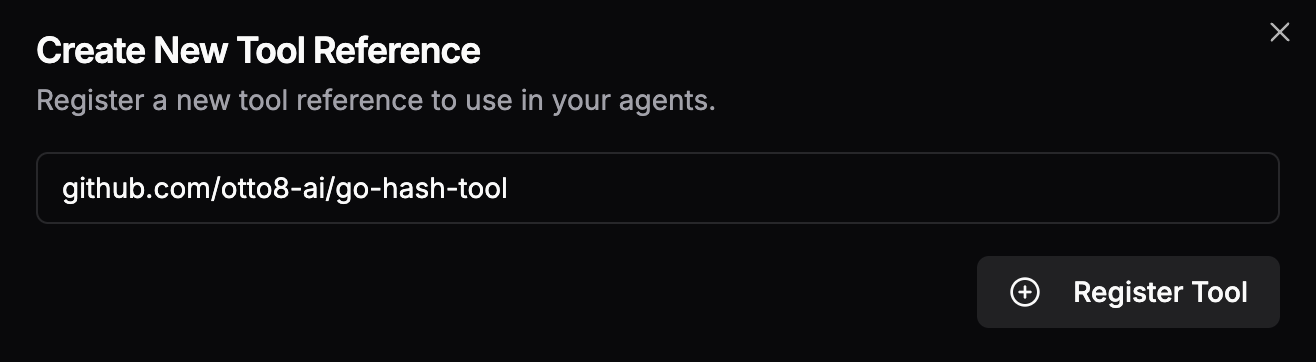
Before a tool can be used by an agent, an admin must first add the tool to Obot by performing the steps below:
-
Navigate to the Obot admin UI in a browser and open the Tools page by clicking the Tools button in the left drawer

-
Click the Register New Tool button on the right

-
Type the tool repo reference into the modal's input box and click Register Tool
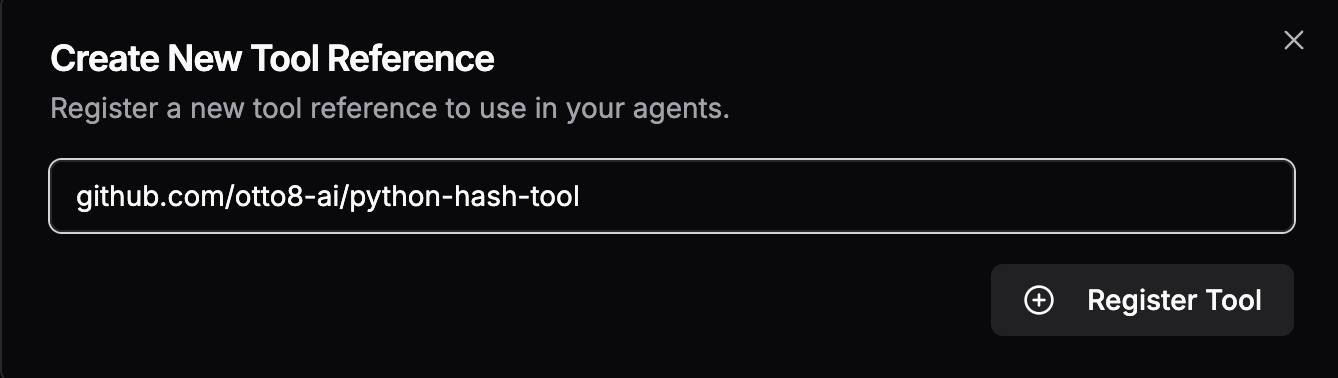
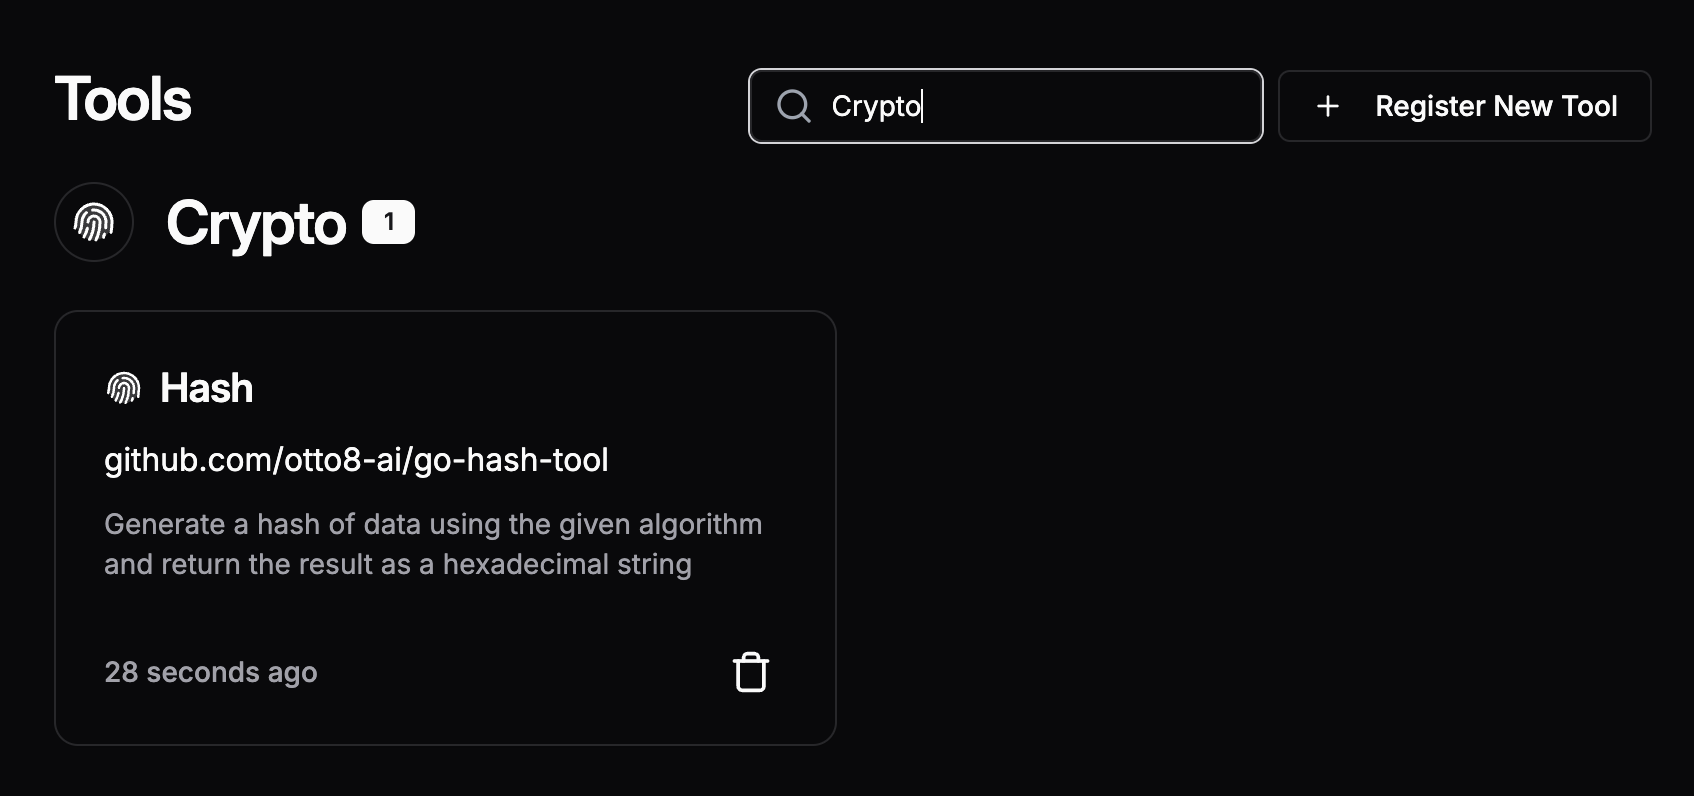
Once the tool has been added, you can search for it by category or name on the Tools page to verify
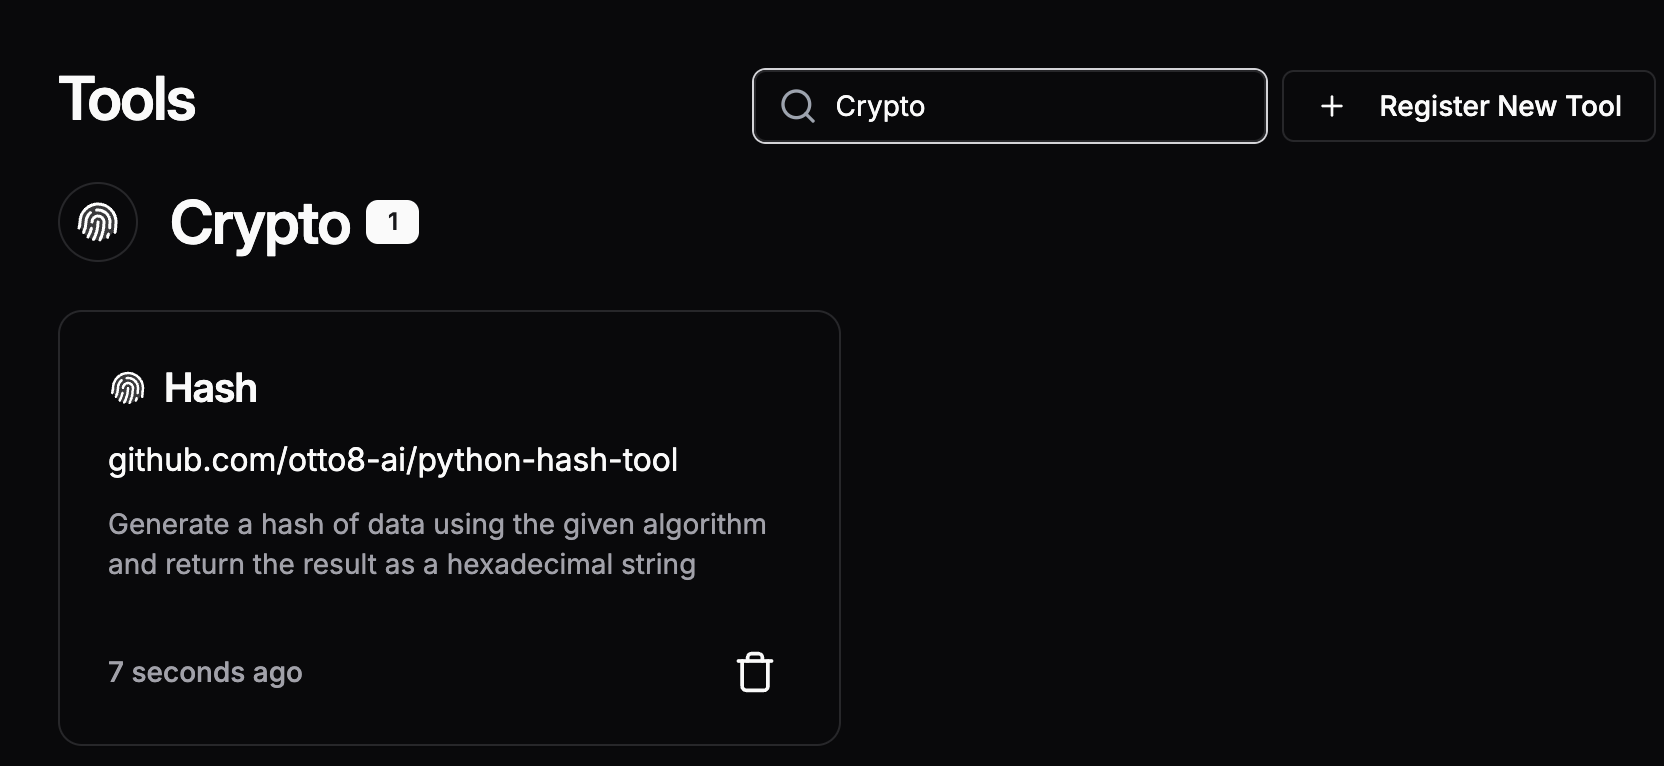
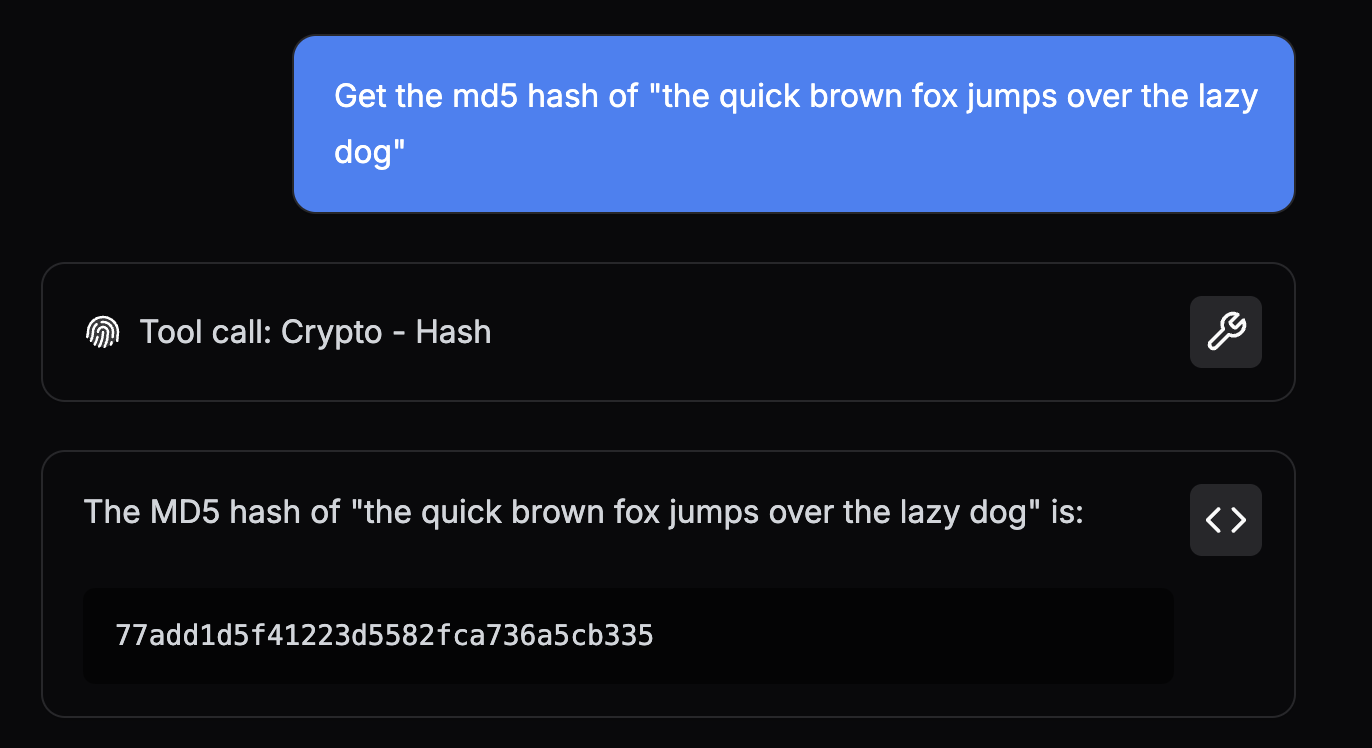
Using The Hash tool in an agent
To use the Hash tool in an agent, open the agent's Edit page, then:
-
Click the Add Tool button under either the Agent Tools or User Tools sections
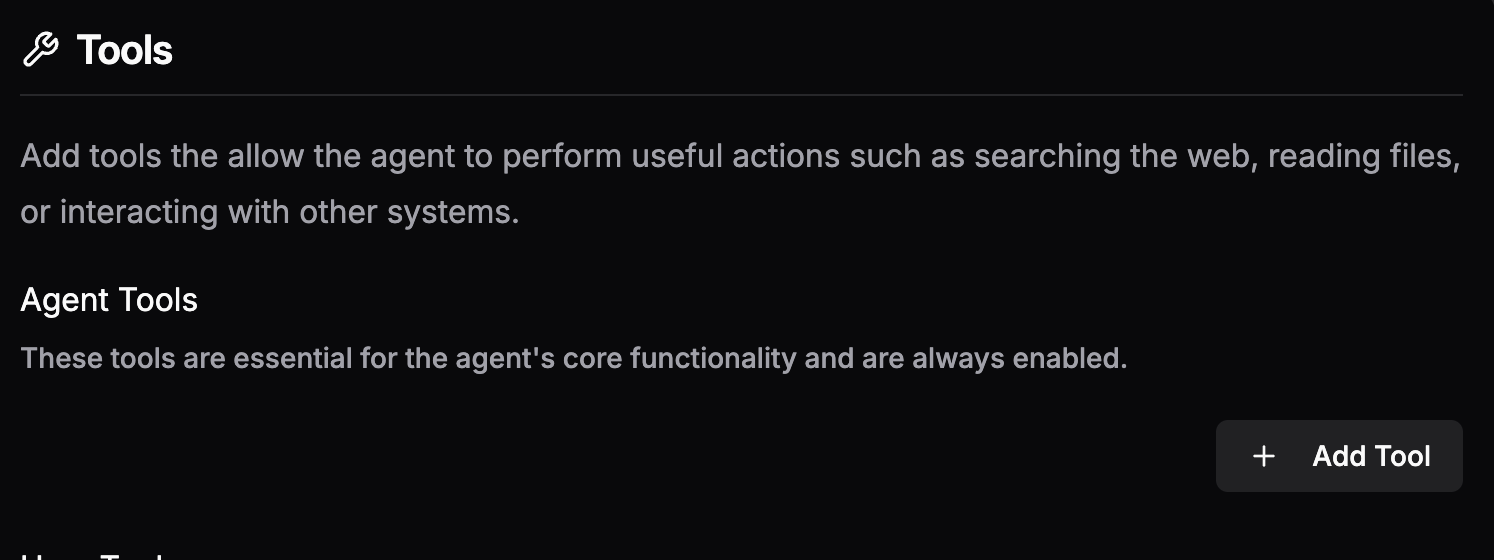
-
Search for "Hash" or "Crypto" in the tool search pop-out and select the
HashTool
-
Ask the agent to generate a hash

Writing your first tool in Node.js (with Typescript)
node-hash-tool contains a reference TypeScript Node.js implementation of the Hash tool.
This guide walks through the structure and design of the tool and outlines the packaging requirements for Obot
To clone this repo and follow along, run the following command:
git clone git@github.com:obot-platform/node-hash-tool
Tool Repo Structure
The directory tree below highlights the files required to implement Hash in TypeScript and package it for Obot.
node-hash-tool
├── package-lock.json
├── package.json
├── tsconfig.json
├── tool.gpt
└── src
    ├── hash.ts
    └── tools.ts
Note: The
tsconfig.jsonfile is only required for tools written in TypeScript. It is not necessary for tools written in JavaScript.
Defining the Hash tool
The tool.gpt file contains GPTScript Tool Definitions which describe a set of tools that can be used by agents in Obot.
Every Tool repository must have a tool.gpt file in its root directory.
The tools defined in this file must have a Name and Description that will help agents understand what the tool does, what it returns (if anything), and all the Parameters it takes.
Agents use these details to infer a tool's usage.
We call the section of a tool definition that contains this info a Preamble.
We want the Hash tool to return the hash of some given data. It would also be nice to support a few different algorithms for the agent to choose from.
Let's take a look at the Preamble for Hash to see how that's achieved:
Name: Hash
Description: Generate a hash of data using the given algorithm and return the result as a hexadecimal string
Param: data: The data to hash
Param: algo: The algorithm to generate a hash with. Supports "sha256" and "md5". Default is "sha256"
Breaking this down a bit:
- The
Preambleabove declares a tool namedHash. - The
Paramfields enumerate the arguments that an agent must provide when callingHash,dataandalgo. - In this case, the description of the
algoparameter outlines the valid options (sha256ormd5) and defines a default value (sha256) - The
Descriptionexplains whatHashreturns with respect to the given arguments; the hash ofdatausing the algorithm selected withalgo.
Immediately below the Preamble is the Tool Body, which tells Obot how to execute the tool:
#!/usr/bin/env npm --silent --prefix ${GPTSCRIPT_TOOL_DIR} run tool -- hash
This is where the magic happens.
To simplify, when an Agent calls the Hash tool, Obot reads this line and then:
- Downloads the appropriate
Node.jstoolchain (nodeandnpm) - Sets up a working directory for the tool
- Installs the dependencies from the tool's
package.jsonandpackage-lock.json - Projects the call arguments onto environment variables (
DATAandALGO) - Runs
npm --silent --prefix ${GPTSCRIPT_TOOL_DIR} run tool -- hash
Putting it all together, here's the complete definition of the Hash tool.
Name: Hash
Description: Generate a hash of data using the given algorithm and return the result as a hexadecimal string
Param: data: The data to hash
Param: algo: The algorithm to generate a hash with. Default is "sha256". Supports "sha256" and "md5".

#!/usr/bin/env npm --silent --prefix ${GPTSCRIPT_TOOL_DIR} run tool -- hash
Tool Metadata
The snippet below (from the tool.gpt file) also provides the following metadata for use in Obot:
!metadata:*:categorywhich tags all tools in thetool.gptfile with theCryptocategory to promote organization and discovery!metadata:*:iconwhich assignshttps://cdn.jsdelivr.net/npm/@phosphor-icons/core@2/assets/duotone/fingerprint-duotone.svgas the tool icon to all tools in thetool.gptfile
Note:
*is a wildcard pattern that applies the metadata to all tools in thetool.gptfile.
---
!metadata:*:category
Crypto

---
!metadata:*:icon
https://cdn.jsdelivr.net/npm/@phosphor-icons/core@2/assets/duotone/fingerprint-duotone.svg
Note: Metadata can be applied to a specific tool by either specifying the exact name (e.g. !metadata:Hash:category) or by adding the metadata directly to a tool's Preamble
!metadata:Hash:category) or by adding the metadata directly to a tool's PreambleName: Hash
Metadata: category: Crypto
Metadata: icon: https://cdn.jsdelivr.net/npm/@phosphor-icons/core@2/assets/duotone/fingerprint-duotone.svg
Complete tool.gpt
---
Name: Hash
Description: Generate a hash of data using the given algorithm and return the result as a hexadecimal string
Param: data: The data to hash
Param: algo: The algorithm to generate a hash with. Supports "sha256" and "md5". Default is "sha256"

#!/usr/bin/env npm --silent --prefix ${GPTSCRIPT_TOOL_DIR} run tool -- hash

---
!metadata:*:category
Crypto

---
!metadata:*:icon
https://cdn.jsdelivr.net/npm/@phosphor-icons/core@2/assets/duotone/fingerprint-duotone.svg
Implementing Business Logic
As we saw earlier, the npm command invoked by the Tool Body passes hash as an argument to the tool script.
npm --silent --prefix ${GPTSCRIPT_TOOL_DIR} run tool -- hash
To figure out what this resolves to, let's inspect the tool script defined in package.json:
  "scripts": {
    "tool": "node --no-warnings --loader ts-node/esm src/tools.ts"
  },
This means that when the Tool Body is executed, the effective command that runs is:
node --no-warnings --loader ts-node/esm src/tools.ts hash
Note: The
--loader ts-node/esmoption, in conjunction with the contents oftsconfig.json, is the "special sauce" that lets us run TypeScript code directly without transpiling it to JavaScript first.
To summarize, when the Hash tool is called by an agent, src/tools.ts gets run with hash as an argument.
Let's walk through the src/tools.ts to understand what happens at runtime:
// ...
const cmd = process.argv[2]
try {
    switch (cmd) {
        case 'hash':
            console.log(hash(process.env.DATA, process.env.ALGO))
            break
        default:
            console.log(`Unknown command: ${cmd}`)
            process.exit(1)
    }

} catch (error) {
    // Print the error to stdout so that it can be captured by the GPTScript
    console.log(`${error}`)
    process.exit(1)
}
This code implements a simple CLI that wraps business logic in a try/catch block and forwards any exceptions to stdout. Writing errors to stdout instead of stderr is crucial because only stdout is returned to the agent, while stderr is discarded.
Note: The simple CLI pattern showcased above is also easily extensible; adding business logic for new tools becomes a matter of adding a new case to the switch statement.
switch statement.For example, if we wanted to add a new tool to verify a given hash, we'd add a verify case:
switch (cmd) {
    case 'verify':
        console.log(verify(process.env.HASH, process.env.DATA, process.env.ALGO))
        break
    case 'hash':
        // ...
    default:
        // ...
    }
And the body of the Verify tool would pass verify to the tool script instead of hash:
Name: Verify
# ...

#!/usr/bin/env npm --silent --prefix ${GPTSCRIPT_TOOL_DIR} run tool -- verify
When "hash" is passed as an argument, the code extracts the data and algo tool arguments from the respective environment variables, then passes them to the hash function.
The hash function is where the bulk of the business logic is implemented.
import { createHash } from 'node:hash';

const SUPPORTED_ALGORITHMS = ['sha256', 'md5'];

export function hash(data: string = '', algo = 'sha256'): string {
  if (data === '') {
    throw new Error("A non-empty data argument must be provided");
  }

  if (!SUPPORTED_ALGORITHMS.includes(algo)) {
    throw new Error(`Unsupported hash algorithm ${algo} not in [${SUPPORTED_ALGORITHMS.join(', ')}]`);
  }

  return JSON.stringify({
    algo,
    hash: createHash(algo).update(data).digest('hex'),
  });
}
It starts off by validating the data and algo arguments.
When an argument is invalid, the function throws an exception that describes the validation issue in detail.
The goal is to provide useful information that an agent can use to construct valid arguments for future calls.
For example, when an invalid algo argument is provided, the code returns an error that contains the complete list of valid algorithms.
Once it determines that all the arguments are valid, it calculates the hash and writes a JSON object to stdout. This object contains the hash and the algorithm used to generate it.
  // ...
  return JSON.stringify({
    algo,
    hash: createHash(algo).update(data).digest('hex'),
  });
Note: Producing structured data with extra contextual info (e.g. the algorithm) is considered good form. It's a pattern that improves the agent's ability to correctly use the tool's result over time.
Complete package.json, src/tools.ts, and src/hash.ts
package.json, src/tools.ts, and src/hash.ts{
"type": "module",
"scripts": {
"tool": "node --no-warnings --loader ts-node/esm src/tools.ts"
},
"dependencies": {
"@types/node": "^20.16.11",
"ts-node": "^10.9.2",
"typescript": "^5.4.5"
},
"devDependencies": {}
}
// src/tools.ts
import { hash } from './hash.ts'

if (process.argv.length !== 3) {
    console.error('Usage: node tool.ts <command>')
    process.exit(1)
}

const cmd = process.argv[2]
try {
    switch (cmd) {
        case 'hash':
            console.log(hash(process.env.DATA, process.env.ALGO))
            break
        default:
            console.log(`Unknown command: ${cmd}`)
            process.exit(1)
    }

} catch (error) {
    // Print the error to stdout so that it can be captured by the GPTScript
    console.log(`${error}`)
    process.exit(1)
}
// src/hash.ts
import { createHash } from 'node:hash';

const SUPPORTED_ALGORITHMS = ['sha256', 'md5'];

export function hash(data: string = '', algo = 'sha256'): string {
  if (data === '') {
    throw new Error("A non-empty data argument must be provided");
  }

  if (!SUPPORTED_ALGORITHMS.includes(algo)) {
    throw new Error(`Unsupported hash algorithm ${algo} not in [${SUPPORTED_ALGORITHMS.join(', ')}]`);
  }

  return JSON.stringify({
    algo,
    hash: createHash(algo).update(data).digest('hex'),
  });
}
Testing src/tools.ts and src/hash.ts Locally
Before adding a tool to Obot, verify that the TypeScript business logic works on your machine.
To do this, run through the following steps in the root of your local fork:
-
Install dependencies
npm install -
Run the tool with some test arguments:
Command Output DATA='foo' npm run tool hash{ "algo": "sha256", "hash": "2c26b46b68ffc68ff99b453c1d30413413422d706483bfa0f98a5e886266e7ae" }npm run tool hashError: A data argument must be providedDATA='foo' ALGO='md5' npm run tool hash{ "algo": "md5", "hash": "acbd18db4cc2f85cedef654fccc4a4d8" }DATA='foo' ALGO='whirlpool' npm run tool hashError: Unsupported hash algorithm: whirlpool not in ['sha256', 'md5']
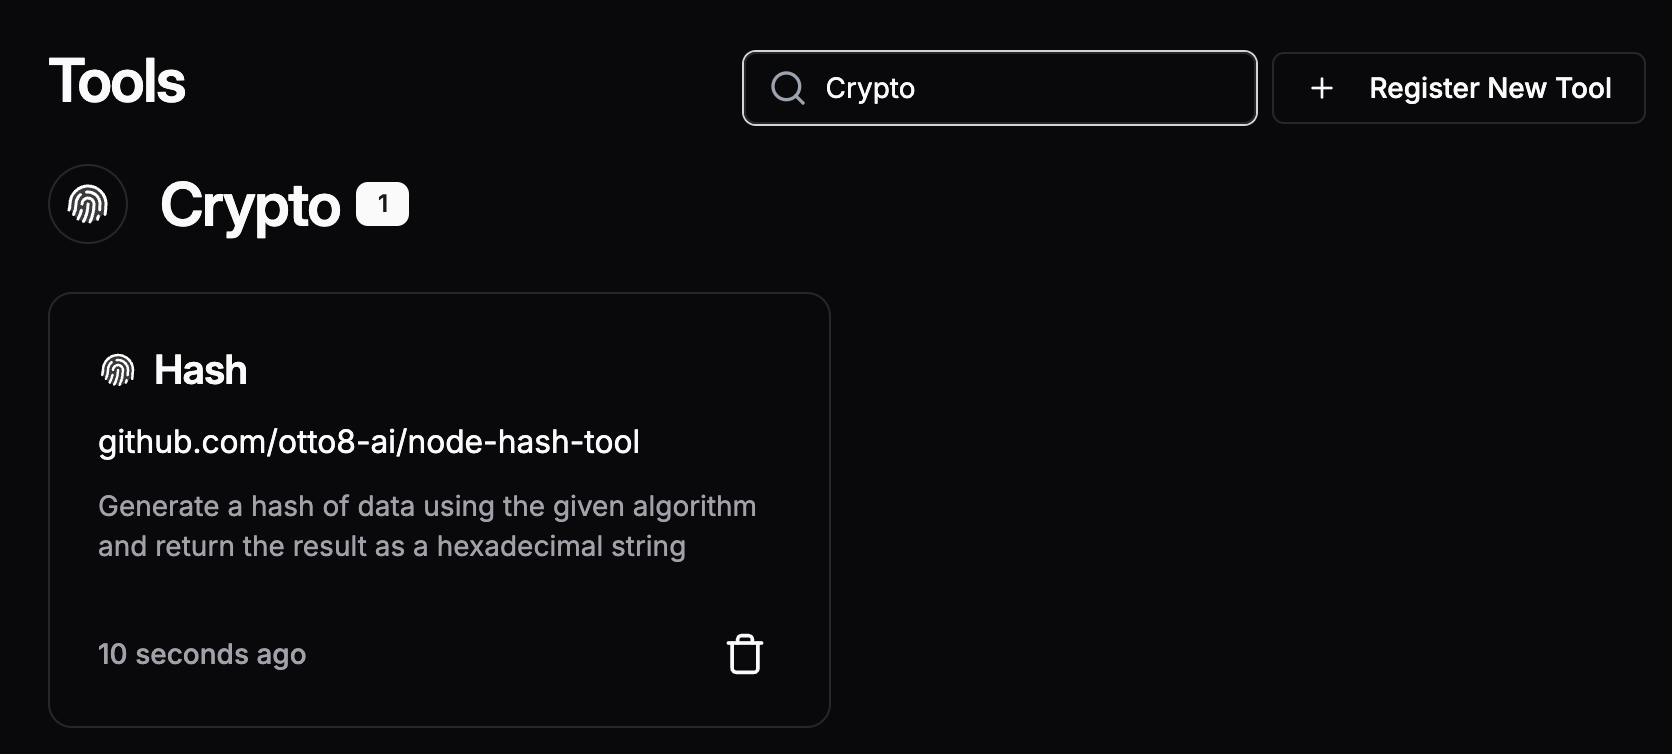
Adding The Hash tool to Obot
Before a tool can be used by an agent, an admin must first add the tool to Obot by performing the steps below:
-
Navigate to the Obot admin UI in a browser and open the Tools page by clicking the Tools button in the left drawer

-
Click the Register New Tool button on the right

-
Type the tool repo reference into the modal's input box and click Register Tool

Once the tool has been added, you can search for it by category or name on the Tools page to verify
Using The Hash tool in an agent
To use the Hash tool in an agent, open the agent's Edit page, then:
-
Click the Add Tool button under either the Agent Tools or User Tools sections

-
Search for "Hash" or "Crypto" in the tool search pop-out and select the
HashTool
-
Ask the agent to generate a hash

Writing your first tool in Go
go-hash-tool contains a reference Go implementation of the Hash tool.
This guide walks through the structure and design of the tool and outlines the packaging requirements for Obot
To clone this repo and follow along, run the following command:
git clone git@github.com:obot-platform/go-hash-tool
Tool Repo Structure
The directory tree below highlights the files required to implement Hash in Go and package it for Obot.
go-hash-tool
├── tool.gpt
├── go.mod
├── main.go
└── commands
    └── hash.go
Note: Most tools implemented in Go will also have a
go.sum, which is required if the tool has dependencies. It is not present in the reference implementation because it has no external dependencies and relies solely on the Go standard library.
Defining the Hash Tool
The tool.gpt file contains GPTScript Tool Definitions which describe a set of tools that can be used by agents in Obot.
Every tool repository must have a tool.gpt file in its root directory.
The tools defined in this file must have a Name and Description that will help agents understand what the tool does, what it returns (if anything), and all the Parameters it takes.
Agents use these details to infer a tool's usage.
We call the section of a tool definition that contains this info a Preamble.
We want the Hash tool to return the hash of some given data. It would also be nice to support a few different algorithms for the agent to choose from.
Let's take a look at the Preamble for Hash to see how that's achieved:
Name: Hash
Description: Generate a hash of data using the given algorithm and return the result as a hexadecimal string
Param: data: The data to hash
Param: algo: The algorithm to generate a hash with. Supports "sha256" and "md5". Default is "sha256"
Breaking this down a bit:
- The
Preambleabove declares a tool namedHash. - The
Paramfields enumerate the arguments that an agent must provide when callingHash,dataandalgo. - In this case, the description of the
algoparameter outlines the valid options (sha256ormd5) and defines a default value (sha256) - The
Descriptionexplains whatHashreturns with respect to the given arguments; the hash ofdatausing the algorithm selected withalgo.
Immediately below the Preamble is the Tool Body, which tells Obot how to execute the tool:
#!{GPTSCRIPT_TOOL_DIR}/bin/gptscript-go-tool hash
This is where the magic happens.
To simplify, when an agent calls the Hash tool, Obot reads this line and then:
- Downloads the appropriate
Gotoolchain - Sets up a working directory for the tool
- Runs
go buildto install dependencies (fromgo.modandgo.sum) and build a binary namedgptscript-go-tool(gptscript-go-tool.exeon Windows) - Projects the call arguments onto environment variables (
DATAandALGO) - Runs
gptscript-go-tool hash
Putting it all together, here's the complete definition of the Hash tool:
Name: Hash
Description: Generate a hash of data using the given algorithm and return the result as a hexadecimal string
Param: data: The data to hash
Param: algo: The algorithm to generate a hash with. Default is "sha256". Supports "sha256" and "md5".

#!{GPTSCRIPT_TOOL_DIR}/bin/gptscript-go-tool hash
Tool Metadata
The snippet below (from the tool.gpt file) also provides the following metadata for use in Obot:
!metadata:*:categorywhich tags all tools in thetool.gptfile with theCryptocategory to promote organization and discovery!metadata:*:iconwhich assignshttps://cdn.jsdelivr.net/npm/@phosphor-icons/core@2/assets/duotone/fingerprint-duotone.svgas the tool icon to all tools in thetool.gptfile
Note:
*is a wildcard pattern that applies the metadata to all tools in thetool.gptfile.
---
!metadata:*:category
Crypto

---
!metadata:*:icon
https://cdn.jsdelivr.net/npm/@phosphor-icons/core@2/assets/duotone/fingerprint-duotone.svg
Note: Metadata can be applied to a specific tool by either specifying the exact name (e.g. !metadata:Hash:category) or by adding the metadata directly to a tool's Preamble
!metadata:Hash:category) or by adding the metadata directly to a tool's PreambleName: Hash
Metadata: category: Crypto
Metadata: icon: https://cdn.jsdelivr.net/npm/@phosphor-icons/core@2/assets/duotone/fingerprint-duotone.svg
Complete tool.gpt
---
Name: Hash
Description: Generate a hash of data using the given algorithm and return the result as a hexadecimal string
Param: data: The data to hash
Param: algo: The algorithm to generate a hash with. Supports "sha256" and "md5". Default is "sha256"

#!{GPTSCRIPT_TOOL_DIR}/bin/gptscript-go-tool hash

---
!metadata:*:category
Crypto

---
!metadata:*:icon
https://cdn.jsdelivr.net/npm/@phosphor-icons/core@2/assets/duotone/fingerprint-duotone.svg
Implementing Business Logic
The main.go file is the entry point of the gptscript-go-tool binary that is executed by Obot when the Hash tool is called.
Let's walk through the code to understand what happens at runtime:
// ...
switch cmd := os.Args[0]; cmd {
case "hash":
    res, err = commands.Hash(os.Getenv("DATA"), os.Getenv("ALGO"))
default:
    err = fmt.Errorf("Unsupported command: %s", cmd)
}

if err != nil {
    fmt.Println(err)
    os.Exit(1)
}

if res != "" {
    fmt.Println(res)
}
This code implements a simple CLI responsible for dispatching the commands.Hash function on request -- when hash is passed in as an argument -- after extracting the tool arguments, data and algo, from the respective environment variables.
It also ensures that the return value and errors of the call to commands.Hash are written to stdout. This is crucial because only stdout is returned to the agent, while stderr is discarded.
Note: The simple CLI pattern showcased above is also easily extensible; adding business logic for new tools becomes a matter of adding a new case to the switch statement.
switch statement.For example, to add business logic for a new tool to verify a hash, we just have to tack on verify case:
// ...
case "verify":
     res, err = commands.Verify(os.Getenv("HASH"), os.Getenv("DATA"), os.Getenv("ALGO"))
case "hash":
    // ...
default:
    //...
The Body of the Verify tool definition would then simply pass verify to gptscript-go-tool instead of hash:
Name: Verify
# ...

#!{GPTSCRIPT_TOOL_DIR}/bin/gptscript-go-tool verify
The commands.Hash function implements the bulk of the Hash tool's business logic.
It starts off by validating the data and algo arguments.
func Hash(data, algo string) (string, error) {
    if data == "" {
        return "", fmt.Errorf("A non-empty data argument must be provided")
    }

    if algo == "" {
        algo = "sha256"
    }

    sum, ok := hashFunctions[algo]
	if !ok {
		return "", fmt.Errorf("Unsupported hash algorithm: %s not in [%s]", algo, hashFunctions)
	}
    // ...
When an argument is invalid, the function returns an error that describes the validation issue in detail.
The goal is to provide useful information that an agent can use to construct valid arguments for future calls.
For example, when an invalid algo argument is provided, the code returns an error that contains the complete list of valid algorithms.
Once it determines that all the arguments are valid, it calculates the hash and writes a JSON object to stdout. This object contains both the hash and the algorithm used to generate it.
    // ...
    hash, err := json.Marshal(hashResult{
		Algo: algo,
		Hash: hex.EncodeToString(sum([]byte(data))),
	})
	if err != nil {
		return "", fmt.Errorf("Failed to marshal hash result: %w", err)
	}

	return string(hash), nil
}
Note: Producing structured data with extra contextual info (e.g. the algorithm) is considered good form. It's a pattern that improves the agent's ability to correctly use the tool's result over time.
Complete main.go and hash.go
// main.go
package main

import (
	"fmt"
	"os"

	"github.com/obot-platform/go-hash-tool/commands"
)

func main() {
	if len(os.Args) != 2 {
		fmt.Println("Usage: gptscript-go-tool <command>")
		os.Exit(1)
	}

	var (
		err error
		res string
	)
	switch cmd := os.Args[1]; cmd {
	case "hash":
		res, err = commands.Hash(os.Getenv("DATA"), os.Getenv("ALGO"))
	default:
		err = fmt.Errorf("Unsupported command: %s", cmd)
	}

	if err != nil {
		fmt.Println(err)
		os.Exit(1)
	}

	if res != "" {
		fmt.Println(res)
	}
}
// commands/hash.go
package commands

import (
	"crypto/md5"
	"crypto/sha256"
	"encoding/hex"
	"encoding/json"
	"fmt"
	"sort"
	"strings"
)

func Hash(data, algo string) (string, error) {
	if data == "" {
		return "", fmt.Errorf("A non-empty data argument must be provided")
	}

	if algo == "" {
		algo = "sha256"
	}

	sum, ok := hashFunctions[algo]
	if !ok {
		return "", fmt.Errorf("Unsupported hash algorithm: %s not in [%s]", algo, hashFunctions)
	}

	hash, err := json.Marshal(hashResult{
		Algo: algo,
		Hash: hex.EncodeToString(sum([]byte(data))),
	})
	if err != nil {
		return "", fmt.Errorf("Failed to marshal hash result: %w", err)
	}

	return string(hash), nil
}

type hashResult struct {
	Algo string `json:"algo"`
	Hash string `json:"hash"`
}

var hashFunctions = hashFuncSet{
	"sha256": func(d []byte) []byte { h := sha256.Sum256(d); return h[:] },
	"md5":    func(d []byte) []byte { h := md5.Sum(d); return h[:] },
}

type hashFuncSet map[string]func([]byte) []byte

func (s hashFuncSet) String() string {
	return strings.Join(keys(s), ", ")
}

func keys[V any](m map[string]V) []string {
	set := make([]string, 0, len(m))
	for k := range m {
		set = append(set, k)
	}

	sort.Strings(set)
	return set
}
Testing main.go Locally
Before adding a tool to Obot, verify that the Go business logic works on your machine.
To do this, run through the following steps in the root of your local fork:
-
Install dependencies and build the binary
make build -
Run the tool with some test arguments:
Command Output DATA='foo' bin/gptscript-go-tool hash{ "algo": "sha256", "hash": "2c26b46b68ffc68ff99b453c1d30413413422d706483bfa0f98a5e886266e7ae" }DATA='' bin/gptscript-go-tool hashError: A data argument must be providedDATA='foo' ALGO='md5' bin/gptscript-go-tool hash{ "algo": "md5", "hash": "acbd18db4cc2f85cedef654fccc4a4d8" }DATA='foo' ALGO='whirlpool' bin/gptscript-go-tool hashError: Unsupported hash algorithm: whirlpool not in ['sha256', 'md5']
Adding the Hash tool to Obot
Before a tool can be used by an agent, an admin must first add the tool to Obot by performing the steps below:
-
Navigate to the Obot admin UI in a browser and open the Tools page by clicking the Tools button in the left drawer
-
Click the Register New Tool button on the right

-
Type the tool repo reference into the modal's input box and click Register Tool
Once the tool has been added, you can search for it by category or name on the Tools page to verify
Using The Hash tool in an agent
To use the Hash tool in an agent, open the agent's Edit page, then:
-
Click the Add Tool button under either the Agent Tools or User Tools sections

-
Search for "Hash" or "Crypto" in the tool search pop-out and select the
Hashtool
-
Ask the agent to generate a hash
Next Steps
Read more about how to build tools using GPTScript Docs.